

At the end of 2016, Tesla’s founder and CEO Elon Musk surprised many when he announced the company’s newest version less-than-a-year-old Powerwall home battery system which featured double the capacity of a similar dough… Powerwall 2 – a bombshell that left Tesla haters dumbfounded and humbly wallowing in the expectation that “it would take them forever to match Tesla”.
But no way! I installed a Powerwall 2 in February this year, and wow, this is just what you need if you’re looking to save yourself from the agony of power blackouts and soaring 3-digit electricity bills.
So, What Is A Powerwall Anyway?
If you have no clue what a Powerwall 2 (PW2) is, then this section is a must read before you proceed. If you do know what it is, then simply jump to the next heading.
So first things first, a Powerwall 2 is a slim, weatherproof, no-maintenance and near-silent rechargeable Lithium battery system that comes with its bar-fridged front profile designed near your power board, all perfectly paired with a Gateway box that controls electricity flow to and from your home and the battery system.
Inside the Powerwall 2, there are lots of cylindrical battery cells, amassed into packs that resemble those that power the soon-to-be-unveiled Model 3 electric vehicle.
These battery cells are manufactured in Tesla’s Gigafactory based in Nevada and packaged inside a well-polished white painted steel casing together with an inverter, charger and a water-cooling system. The installation cost of the solar battery system is a little over $13,000 in Brisbane and you can acquire one today from Solargain with a lead time of 2 months.
The system is designed to save your solar panel output during the day, so that when the sun sets (or your solar power system’s generation drops), the Powerwall 2 system comes in to power your entire home until power is restored.
In case of a power outage, the PW2 automatically switches to powering your home from the battery, enabling you to have electricity for your entire house until its discharged, or the battery drops to below par (though this is rare when the sun is shining).
The system can supply about 13kW/h of stored energy when it’s fully charged, and this is enough to carry most households through the night, hence saving you the energy you would otherwise have to pay for. The Powerwall’s energy level it can support is 5kW, 7kW Peak (30 Amps per PW2), adequate to power most kitchen appliances, a split system, air conditioner or charge a short-range electric vehicle (including a Mitsubishi Outlander PHEV which draws just 2kW to fully charge, for 5 hours).
For my two 6.5kW solar power systems (one purchased from local solar business Green Solar – 5.0kW Bosch Inverter and 275W Canadian Solar panels and the other system was supplied by Enviren Solar and has a 5.0kW ABB inverter with 260W Jinko Solar panels) installed on the roof, a rough estimate indicates that the Powerwall 2 could pay for itself in a span of 6 to 7 years and it’s warranted for 10 years.
However, if you haven’t installed a solar system, this is not for you though given the current electricity prices which are expected to soar even higher, now is the time to consider investing in solar cells especially if you own a home and got some space on your roof. Before installing the PW2, my solar panels would power the whole home. When the PW2 kicks in, it’s programmed to supply the general power and lights, and does not include water heater, air conditioners, pool or oven.
You’ll find the financial details of this investment towards the end of this post.

The Solar Battery Installation Process
I placed an order for a Powerwall 2 through the Solargain website in December last year—I must admit, it’s a quick and seamless process with the pricing quoted online, hence it’s transparent and upfront, saving you the hustle of running around comparing quotes. This sets the company apart given that the Australian industry is not short of solar cowboys.
At the time of order, I wasn’t required to transfer a deposit however chose to in good faith. Immediately, Solargain followed up with a number of phone calls, visited my property in Brisbane a few weeks before installation, then sent a request for payment of the balance of $13.5k via a bank transfer on the day of installation.
7:00am: Two vans arrive on site as promised from Solargain. The general manager of Solargain Brisbane Ross Prior, formerly the operations manager at Instyle Solar, was present to semi-supervise the installation process.
The PW2 system came in two big cardboard boxes—one bearing the Gateway and the other the Powerwall 2. The PW2 weighs slightly over 120kg (290 pounds, according to the sticker, though another sticker next to it reads 67Kg, so obviously this whole “metric system adoption” in the United States still contains bugs), in that a trolley is required to push it around. Thankfully, it is wide enough to go through a standard door.
8:00am: The most challenging part of this process is to figure out where the wall studs are so as to mount the bracket. This is because my house has rendered block, making it difficult to locate the best place to mount. The Powerwall 2 is designed to rest on the ground on its feet, while the bracket prevents it from tipping over. Mine is elevated off the ground though, as shown in the pictures.
Solar Installers: Experienced And Confident
8.30am: It appears the crew is fixing it as they move on—3 solar installers in total and they looked confident, boasting hands-on experience installing a PW2 solar battery.
9.00am: The system had been mounted on the outside of my property close to the power board, but again had to be removed. Luckily enough, the able crew easily found a strong support through the rendered block which is important in order to spread the load. The mounting bracket is designed with a Silver Spring clip at the core of the “T” which locks the frame to the PW2, and this clip can only be accessed with something very thin and long, such as a spring-steel ruler. The PW2 came without any tools as Tesla doesn’t provide this in the package. This being the case, the sparkies had to make a feeler to help dismount the battery as they pulled it off and cut the ply down.
9:15am: As it is, all the cables have to head to the side with a junction box placed next to the cooling radiator—featuring a size one which resembles the inter-cooler in a vehicle. No access to the unit’s back is required even though it has a visible wiring gland which is used with installations that need cabling to go through a wall. The black sides are made of plastic and clip firmly in place.
9.30am: The Solargain crew had completed the mounting process and the were now looking at how to wire all the cables linking all the 3 boxes. An installer manual is placed on an iPad, and a set of paper manuals mostly consisting of safety advisories included as well.
1.30pm: The crew had completed all cabling. A clamp is placed on the solar active input to measure the energy generation while the gateway measures the amount of house load received directly from the power cable. Currently the PW2 charges solely from solar.
Phil from Solargain then joint the crew to help team commission the unit. The Gateway features a built-in Neuros WIFI Access Point (TEGxxxx, username is the installer’s email and password is SN#) alongside a LAN port as well as a Telstra 3G telco SIM, though the SIM was yet to be activated by Telstra, and so Phil from Solargain connected it to my WIFI and used a webpage to update the firmware. He noted that the most preferable connection technique to use in future would be the 5G so as not to rely on the availability of WIFI. (If you’re worried about 5G’s health effects, then don’t be)
Tesla website provides the process of connecting in detail. To connect to the Gateway, search for the WIFI AP TEG-xxx and connect to it using SN# as your AP Password. Wait for about 30 seconds and then click through the security warning. To login to the settings page, it’s recommended that you use your email address and the last 5 digits of your SN as the password.
My chosen solar installation company Solargain used an iPad to connect to the Powerwall 2 Gateways’s AP, and marked out the size of the solar inputs, identified my inverter model from a listing, selected the measuring inputs in the Gateway to monitor the load and generation, and accessed my Tesla account login (you create this at the point of ordering, and no ongoing charge is made).
On completion of this particular step, the Gateway’s webpage displayed the present state of the solar power generation, home current draw and the charging status of Powerwall 2. But, the power usage figure for the house appeared too high for the few number of lights switched on at the time. A closer look at the metering setup within the powerboard revealed that the solar net meter was summing the solar production into the home’s input, and ended up powering another clamp present in the powerboard so as to measure the usage load separately.
At exactly 2:30pm, the installation process was done. I imagine they will shave off a few hours in their next installation now that they have gained more experience, especially if there’s a brick wall to mount it on, unlike the foam pillows on my house. To test whether the system was working effectively, I turned on my television set which was visible from the powerboard, and then switched off the mains-input circuit breaker to create a power blackout.
I noted a small thumping of relays within the Gateway, and the TV set did not even flicker. Phil said the switch-over lasts just 30 milliseconds, which was not a problem while powering my PCs, and if your App is open, you receive a notification in the App’s power-flow display that your home is now being powered by backup energy. On again switching on the main circuit breaker, and a few more clicks, the gateway changed to the mains in a span of about 10 seconds later.
For solar installation in Brisbane, local rules dictate that any grid-connected solar system should be shut down immediately in the event grid power goes down or fails. This helps safeguard pole-and-wire technicians. While I expected this to be the case with Powerwall 2, it simply didn’t as it isolates itself from the grid when there’s failure in the grid, and hence the solar system stays on charging the battery and powering the home when the grid fails.
Tidbits
Besides the Tesla App, there’s just one other visible sign of the Powerwall 2 operation—the LED light strip on the lower side of the unit which starts blinking whenever it senses a problem, and remains steady when all is well and pulses gradually when charging or discharging power.
Monitoring: I have been keenly monitoring my home’s load solar power generation through PV Output for about five years now. This service comes in handy and provides a free portal to your home’s power flows through a phone app and webpage, once you install the tiny monitor in your powerbox. The Powerwall 2 unit doesn’t come with the PVOutput data but at the moment, it provides large volumes of information, which Tesla plans to share in the future, but, Phil noted that for now the company was focused on the experience provided by the app. If you wish to check the real-time output on a PC, you can install Blue Stacks (an Android emulator) on your personal computer and open the Tesla app on it.
(Update 7/2/2020: PVoutput integration is complete.
Since I am away from home during the day, most of the power generated in my home is stored to wait for night when much of it is consumed. So my home is a perfect representation of a PW2 system usage.
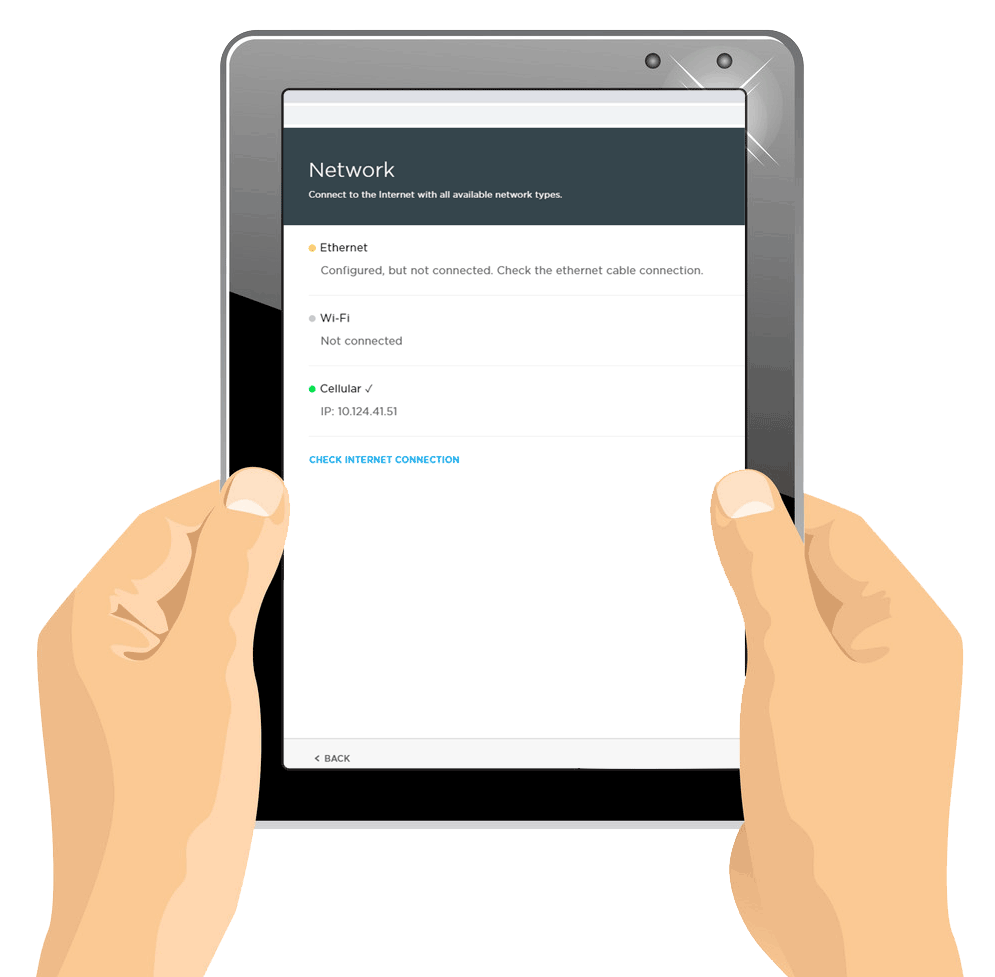
Update 17/02/2020: I’ve discovered that the Gateway carries an essential WebUI that delivers instant information about the power flow. If your LAN or WIFI was used to connect the Gateway, you will get the info without having to run the App.
To successfully complete this, go to your router and check the IP address it assigned to your Gateway (should be a device bearing a long alpha-numeric name ending with the #SN of your PW2). If you insert that IP into any browser, it will bring you the UI page which you can then bookmark for future reference.
Local network connection
If you wish to check this on your local network, all you have to do is hit the DHCP setup in your router and enable it to set the Gateway’s IP address as a constant IP. This way, it will not change even when the router is rebooted or other devices added.
To access it outside your network, you may add a port-forward to your router for the Gateway’s IP: 80 to your router’s external IP address: 8xxx (usually a unique random high port not used before). Next, type your router’s external IP: 8xxx into your browser and a Gateway UI external to your network will show up. If Dynamic DNS is supported by your router, type a host name in order to avoid the challenge of having to remember its external IP every time. This page has a setup option and so be sure to avoid advertising your UI location publicly. Good thing is the setup page is protected using a username and password logins.
There’s extended data provided by another Gateway page: http://
Ideally, this is what Tesla uploads to its servers from the Gateway, which could also be used to generate PVOut data if prompted locally by the PVOut Integration app operating on a local PC.
So, How Long Before You Can Get It?
As it is now, new installs have been booked in their “thousands”. Expect a backlog for hardware to last for about 2 months assuming you order today. Each crew of installers can only do 1-2 installations each day, I bet.
Somehow, the distributor you are using controls the element of when you will have your PW2 system installed, given the different rules and equipment approval timeline procedures that have to be followed, all which go beyond Tesla’s control, hence Tesla is giving priority to customers who are chained to distributors that are already approved.
As always, Elon is setting the pace in this industry, enabling its customers to minimise over dependence on the existing energy monopolies—they are doing everything possible to reduce their uptake of residential battery storage.
AC vs DC: Though Tesla had promised to avail both the DC- and AC- charged Powerwalls, they changed mind and settled on the AC-charged PWs only. Here, Phil says this move helped get rid of potential issues that could arise due to varying DC capabilities of the various solar arrays installed globally, given that the AC output from an existing solar inverter is rather standard in terms of comparison.
Of course, there are some losses that may happen while converting the AC power to DC within the battery, and vice versa, but it also means that you could charge from the grid when tariffs fall, the process of certification is simplified by energy utilities, prices reduce due to scaling of a single type and elimination of procedures requiring PW2 installers to teeter around rewiring existing cabling setups for solar.
Commissioning
Launching it on the very day it’s installed hugely depends on the regulations of the customer’s energy retailer. The battery comes with a switch fixed inside the Gateway to help in bypassing the system.
My energy distributor is Energy Australia, who is more than excited to even sign off on the install, while other energy retailers insist on bringing L2-certified inspectors to commission it. For now, Energy Australia has no problem with installing a maximum of 10kW of solar on a single-phased home. During the installation of the PW2, I also upgraded my switchboard at a total cost of $2,000.
Overloads
I questioned what was going to happen if the houses current draw surpassed the power output generated by the Powerwall 2. In response, Phil said the output voltage would start by dropping before the unit resets to shed off the loads and allow you to switch off whatever appliance that was consuming too much power, a similar scenario when I tried earlier to pop a circuit breaker, as there was a car charging + microwave + dishwasher + column heater, all drawing power at the same time, pushing the load to more than 8kW/h.
Acoustics
This is responsible for making the sporadic faint “tick” and the low-tone humming sound produced when the fans are operating. But this sound can only be heard if you move near it. The fan blows out air using the top right corner, which is opposite the radiator. This one is more silent than the solar inverter which produces a ticking-buzz noise.
Charging
Many potential customers have been asking if there are ways in which the charging can be controlled so as to use off-peak power to charge it, alongside the solar. Here is what I think…
The powerbox on the solar active and the home load supply wires has inductive clamps which instantly alert the Gateway of the solar power output and home load, so it gets to “know” when a net positive output is generated by the solar array. The Powerwall 2 charger is connected to the paired solar+ grid input just after the meter, allowing it to theoretically draw energy anytime of the day and charge electricity by itself from the grid. However, the Gateway informs the charger to only draw energy equivalent to the variance arising between the solar system output and the home load, hence when this figure is zero or lower, the charger automatically switches off.
For example, a solar output of 2.7kW and a home load of 0.4kW, commanding the charger to pull a total of 2.3kW. This way, it reduces reliance on the grid to power your consumption tariff cost. This also explains why the app displays tiny flows of about 0.1kW in two seconds between the solar and grid whenever there’s a shift in the home loads or solar outputs as the charger probably takes a few seconds to ramp up and down to maintain its draw below the available net solar power.
Thanks to Tesla App developers, the App has been linked with weather forecasts, and a provision made to top-up the storage battery through off-peak if the following day will be rainy or cloudy. Hence, even with the impending heavy hail storm forecasts in Rockhampton, you will sit back and laugh at the days to come knowing your PW2 has got you covered.
Update 15/03/2020: I just learnt that the Powerwall 2 can be forced to charge anytime by changing it to a “Backup Only” mode in the app. This allows it to charge at a capacity of 1.7kW/h until it’s full.
Controlling it
The battery discharge cannot be controlled beyond switching it off using the power switch affixed on the side, so that means you can’t employ software to over-ride existing default setting which states “supply power to the home whenever the load is more than the solar and the battery has more than 5% available”. In the rare scenario where you are aware of an impending blackout at a given time, you can let the battery to charge up, and then switch it off until moments before the blackout sets in.
Currently the App comes with a ‘backup only’ option under the ‘Customise’ to help achieve this.
Theft
Some people have raised concerns about the unit being knocked off given that it’s not installed behind a securely locked door. There’s no other way or place to install it especially for those without a garage like me since the thing weights a whole 130kg, and I bet junkies showing up abruptly will not be strong enough to bring it down, and in case they tried, they would need a tow-truck to actually yank it off the wall given the complex clips.
The Tesla ‘Phone App‘
Tesla’s free iPhone or Android app is available for download if you want to manage your Powerwalls or vehicles. A day after the installation, my Tesla app had no registered devices and Phil said an official from Tesla USA would have to tick a box first. I followed up with the Tesla email provided for the payment process, and I was called an hour later to confirm that it was completed (that was a Saturday morning). Ideally, this allows you to know if the system is all clear and ready to run by monitoring the condition of power flows and battery charging.
Powerwall 2 App Screenshots:
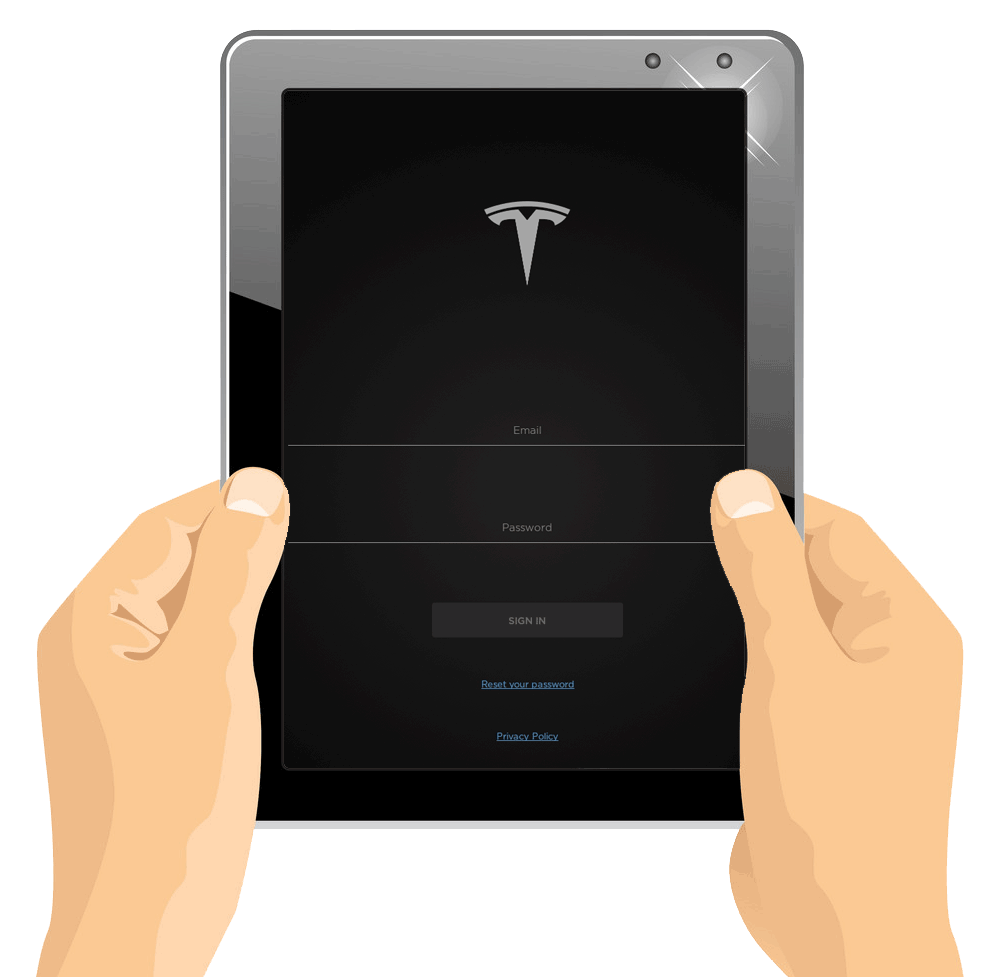
Login
This shows the sign in page. Pretty standard if you ask me.
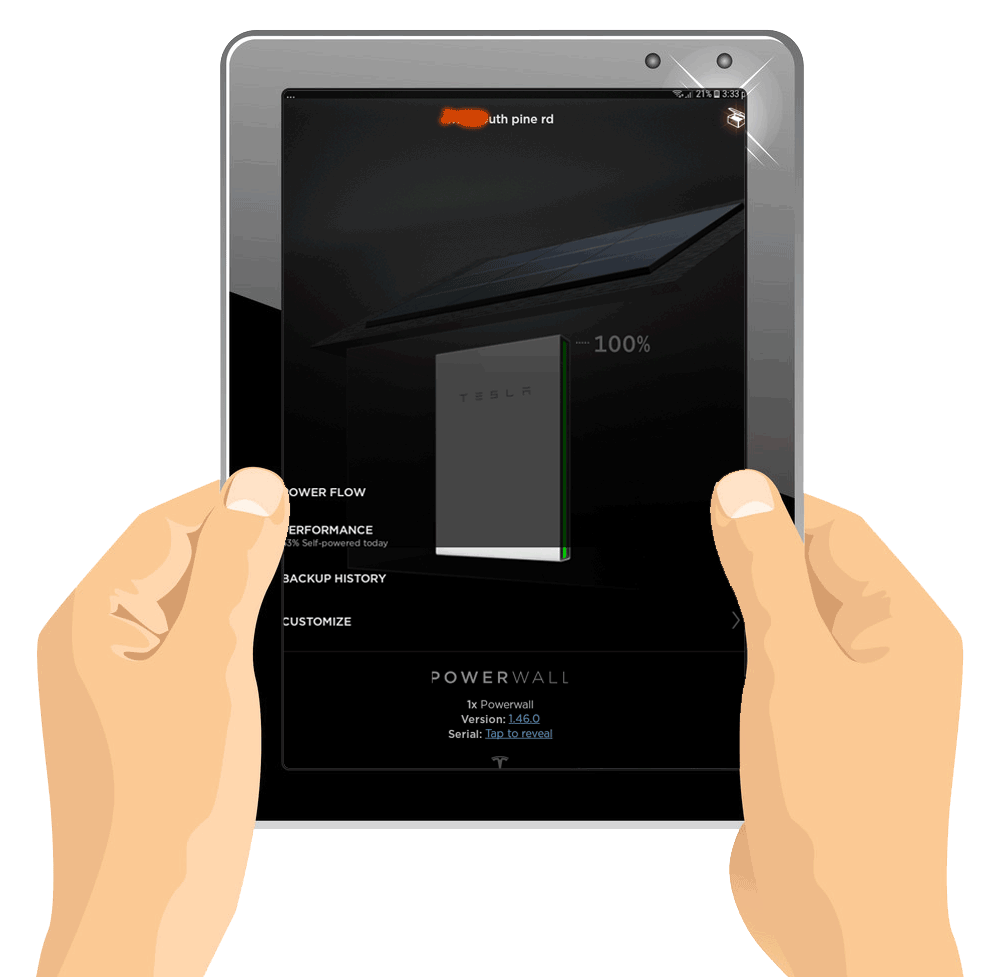
Home screen
This shows the home page once you sign in. On opening the app, it takes about 5 seconds for the current state to be fetched, and a quick glance to check how the battery is running and its charging status. This shot shows my battery is nearly discharged, and every drop of power was consumed from my solar panel array given that it rained the better part of today.
Menu
This page, starting with the first menu bar on the home page, indicates the amount of power your solar panels generated today. The PW2 didn’t really deliver anything, and given that I took the screenshot early afternoon when the total percentage is lowest since the solar can’t even cover the house loads because it rained all day. As the day’s fall quickly approaches, the percentage of the Powerwall 2 will start to go up as it discharges energy to cushion the houses loads. From this display, you can select today, yesterday or last week.
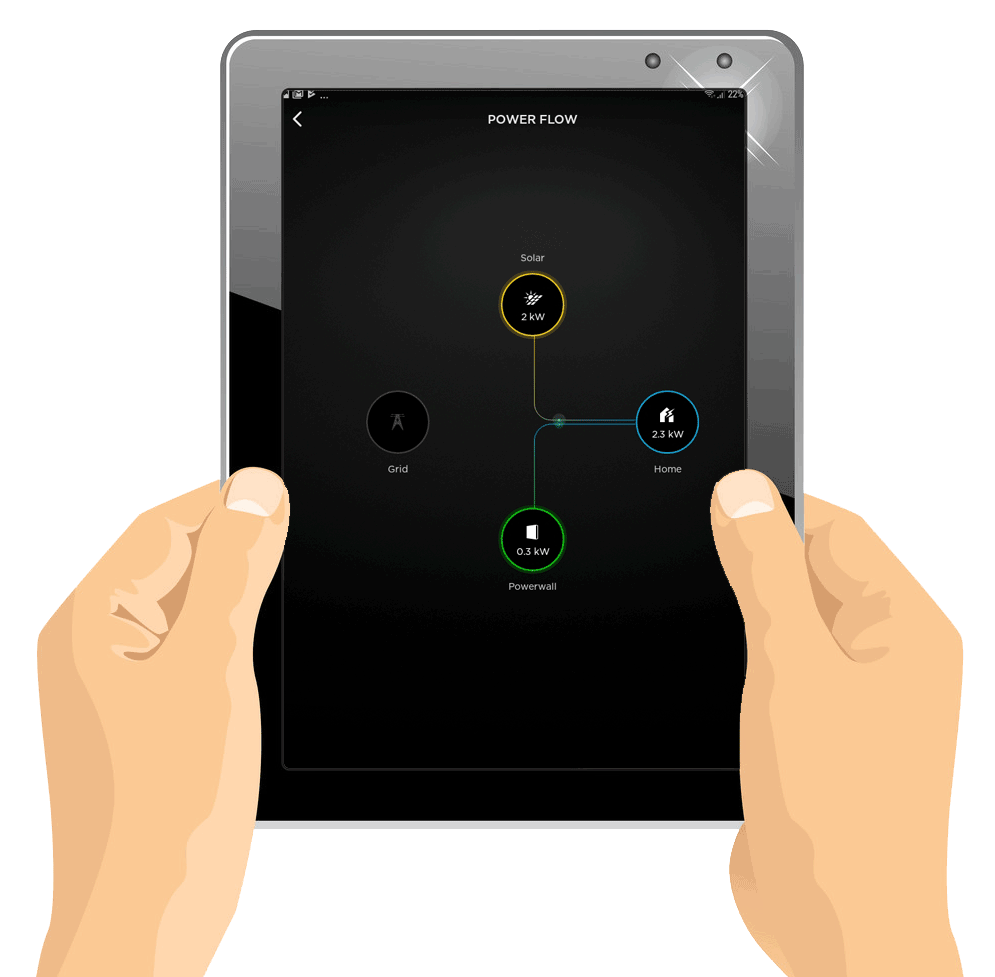
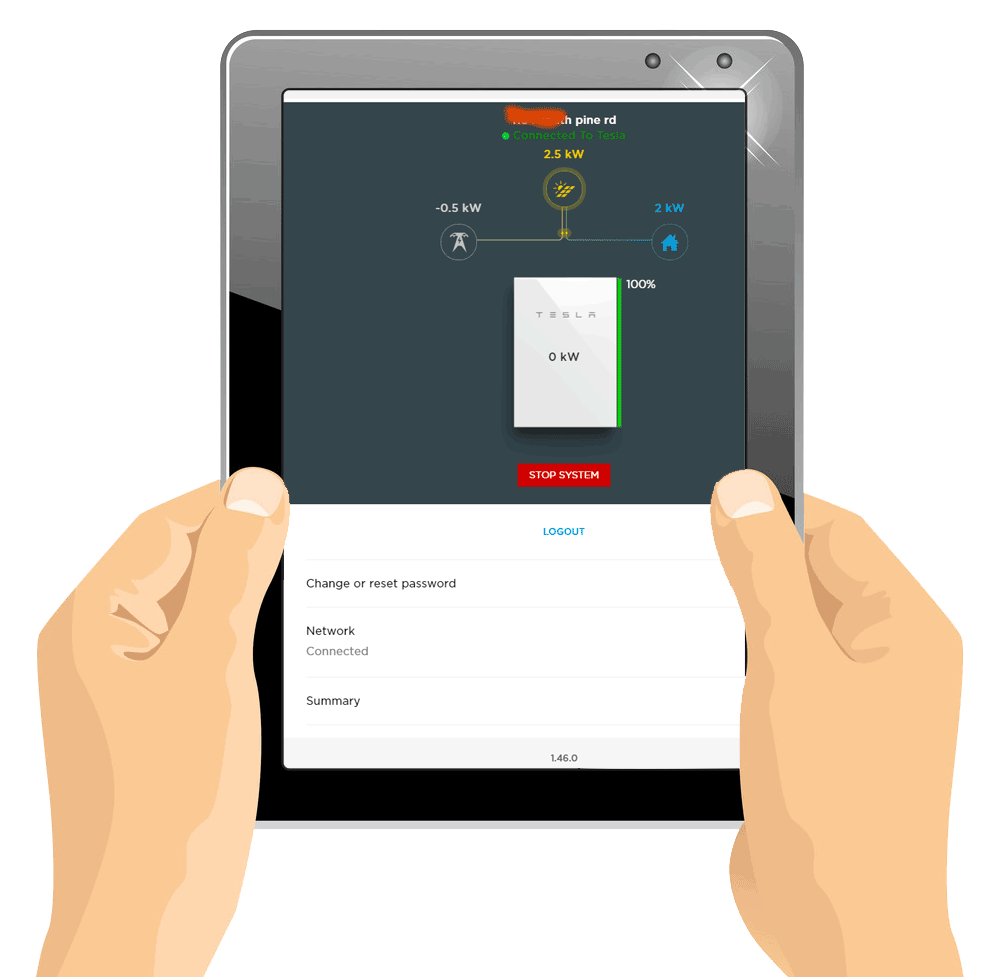
Electricity distribution
The second menu on the home page shows the home’s live electricity distribution or flow. The lines only show up between in given circles when an activity is happening between them. The grey ones are the inactive as they feature animated blobs signifying the direction the current is flowing, and when you press any of the circles or icons on the graph you are taken to the original graphs of the source or load to see the newest day’s history.
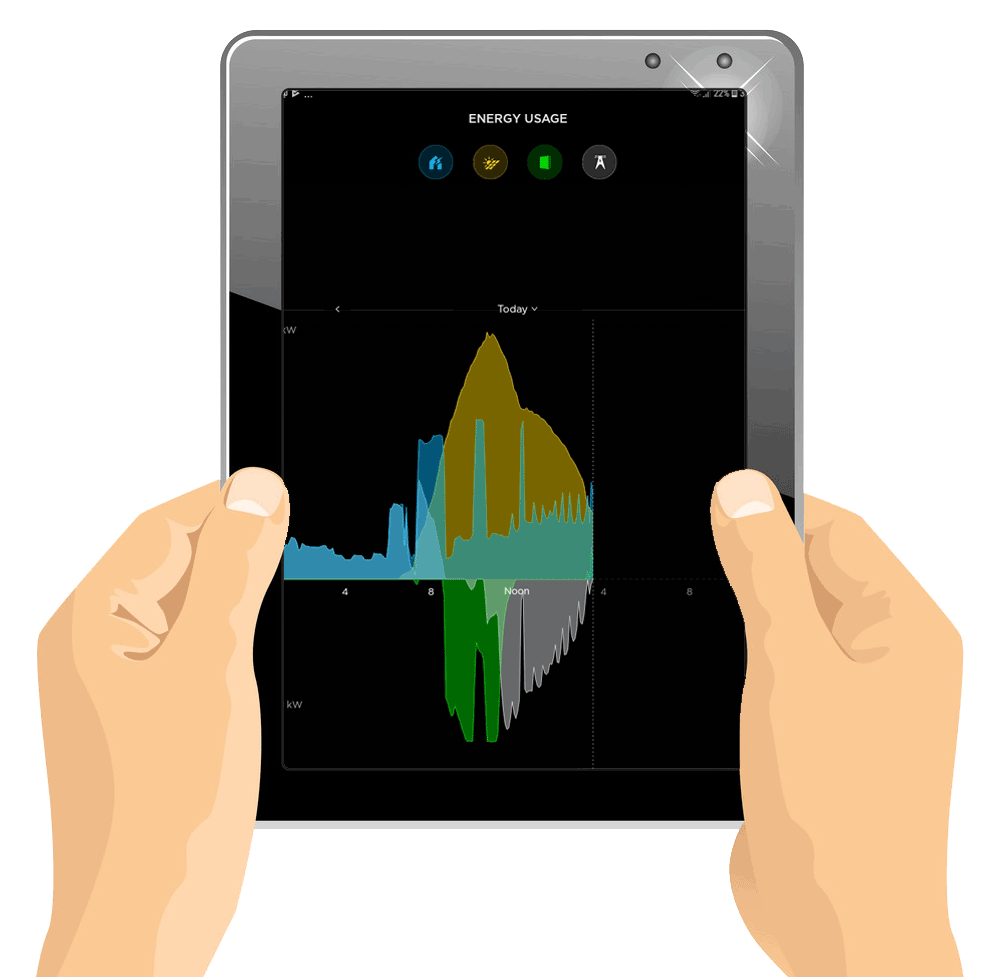
Energy usage graphs
The Powerwall 2 charger automatically adjusts to the different loads delivered by the house. So far, the lowest Powerwall 2 charge rate I’ve received is 0.3kW and the highest being 2.3kW, though this is probably restricted by the rate of solar generation, which didn’t even go beyond 2.7kW today, and again the home’s did not dip below the 0.4kW mark. The updates lag behind real time by about 5 seconds.
The Backup History represents the last homepage option, and tells when the home’s power has been disconnected from the grid and is being powered by battery only.
There’s just a single settings “gear” included in the home page, which provides the App’s version number and enables the use of fingerprint authentication. But, the PW2 is still in its early days and so just like they did with the Tesla cars, I’m sure they’ll add more control over time. For now, the account you created on Tesla site does not provide usage information relating to the Powerwall, hence the app is the only tool to monitor it for now. If you need detailed history about your power generation and use, it’s best to use the Solar Analytics clamps to monitor it then upload to PVOutput. In addition, if you wish to check real-time output on your PC, you can install Blue Stacks—an Android emulator and run the Tesla app on the PC.
Blackouts A Thing Of The Past
Having installed the Powerwall 2, it’s likely that I won’t even notice when a blackout occurs, unless my neighbours come knocking on my door to find out why my home has power while they are in darkness. I will simply point to my PW2, and invite them in to watch a nice movie with me until their power comes back on.
This is how the Tesla app looks like when there’s an outage. It also displayed the amount of solar energy generated and the power flows to my home and battery, but that disappeared as I turned to take this screenshot. The app does show the Powerwall 2 statuses while charging and discharging, along with the solar array generation.
I’ve been asked several times about what happens to the solar panels when there’s a blackout. Well, my solar panels were generating 2.7kW (500watts to power the house, and 2.2kW to charge the PW2), by the time I disconnected the grid, the inverter didn’t behave like it had sensed the disconnection from the grid, since it continued to produce power. Before the Powerwall 2 was installed, the inverter would always shut anytime there was a grid failure, hence the house would be in total blackout, even when the sun was shining hot. Presently, if the grid’s power fails during the day, the solar array takes over to power everything in the house.
The installation company can determine the capacity of battery power to keep as a reserve for the rainy days, so that your battery does not discharge to a near empty state – I left mine at 5% since we rarely get blackouts during winter.
At the moment, the setup site of Powerwall 2 which is usually accessed directly via the WIFI access point) only allows the installer to set the backup “save” level, so that in case of higher potential for a blackout, you can bump up your “saved” capacity to a higher level, and the Powerwall 2 will only discharge power down to this level, and then revert back to mains, saving the specified percentage of power to use only when there’s a blackout. Tesla has promised to update the App as soon as possible to enable us to determine the backup “save” from the app, as noted by one reviewer on another post.
The app features a “Customise” menu at the foot of the homepage, which directs you to a page with the +ve or –ve buttons to adjust the reserve backup capacity. It also has option buttons to control the Backup Only (100% reserve for blackouts) vs. Self-Powered (discharge whenever there’s a load above the solar and capacity is greater than the reserve).
Financial Sense?
The internet is awash with debates over whether it’s viable to invest in a Powerwall 2. I figured the PW2 would not earn your initial investment over its warranty period, with just 6.4kW/h of storage but with a total of 13.5kW/h available, the Powerwall 2 makes financial sense besides the “green energy” feel good stuff when you know you’ve helped offset the CO2 and lessened coal pollution.
One way to approximate this is using the “cost per kilowatt hour for the warranty period output. Assuming 13.5kWh/day x 365 days x 10 years = 49,275KWhr @ $10,700 cost, delivering a best-case scenario of net cost of $0.21 per kW/h spent. In my locality, AGL charges $0.27 / kW/hr for its dirty coal-fired electricity, or $0.32 per kW/h for “renewable” power exported, so this puts me well ahead.
Indeed, some of the excess power that I used to transfer (and get paid $0.06 per kWh) is now directed towards charging the PW2 each day. In the long run, this somehow reduces the saving, to a break-even point.
But remember that the overall cost of a Powerwall 2’s warranted lifetime output is fixed at $10.7k while Energy Australia recorded an 11% electricity price increase, and recently announced that they would be demanding a further 17% for NSW customers.
I guessed that this trend in upsurge in electricity prices is not going away anytime soon, if anything, it will only worsen as electricity distributors get more incentivised by governments to pump more funds into their networks, as they will eventually recoup those costs in addition to a fat markup, from us customers, by law. Consequently, the increase in prices is set to outweigh the “cost of finance”, and not being able to fully utilise the 13.5kW/h generated by the Powerwall 2 during cloudy days.
Here’s a meter reading from my Feb 2020 bill:
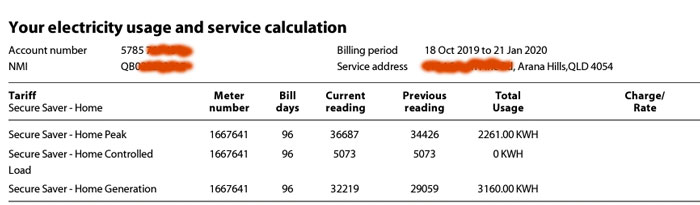
Notice how home controlled load—peak usage (1pm to 8pm) is zero and nearly all consumption is off-peak. Since installing the Powerwall 2, my average power bill is $750 per quarter in usage, minus $500 credit from solar.
So, Is PowerWall 2 Right For You?
Do you have an array of solar panels ranging from 5kW/h and above in size that export electricity yet you aren’t getting an impressive feed-in tariff? Do you use over 15kW/h of energy each day, with most of your power being consumed in the evenings? If your answer to these questions is yes, then the PW2 is for you. If you have already installed a solar panel array on your roof, the Powerwall 2 is certainly the best way to maximise the value of your solar panels. Now that feed-in tariffs are meagre amounts in QLD, by storing your daily solar power output at the expense of the FIT cost, and consuming it during the peak tariff time at night, you end up saving $0.25 or more per kW/h stored.

If you are a resident of SA where coal-supporting politicians, inclement weather and foreign-owned tax-evading electricity monopolies combine to form the highest power prices globally, it’s just common sense to get a Powerwall 2.
I’m in the process of updating my solar power calculator so that you can actually insert your figures for electricity costs, FIT, cost of finance and Powerwall 2 price in there. I made the assumption that a paid-off solar panel array will feed the PW2, and made provision for charging losses though consuming more than the maximum capacity by daytime consumption or off-peak charging would wipe them out.
If you are yet to install a solar system, the spiking prices for gas-fired and coal-fired electricity which are a consequent of our crappy politics will only make Powerwall 2 and solar more and more attractive in future.
Setting up Tesla Wall 2 DNS
First things first, getting the serial number an password.
This is printed on sticker just on the inside of your power management box for the unit. (There is a good picture on the instruction site that shows where the stickers are on boxes)
Now we log into your powerwalls WIFI for the first time.
Think of your powerwall like having it’s own network router built in. This part of the setup is initially connecting to the power wall just to setup which local network to connect to.
You will see a WIFI network called TEG-xxxx; Connect using the password from the sticker on your unit.
It will also likely have a very weak signal which can cause issues particularly if your trying to connect to it over WIFI and you are a bit of distance away.
So before connecting to TEG WIFI, Tesla instructions advises to go into air plane mode first and then join the TEG-xxxx WIFI broadcasted locally.(most likely to prevent WIFI interruptions from other services)
NOTE: If your unit is a considerable distance you might want to move closer to it just for the intitial connection. Ethernet is also an option and a much simpler process of plugging it into your router.
Once connected to your Powerwall’s TEG-xxxx network go to your phone or computers browser and enter the hosts IP. 192.168.91.1.
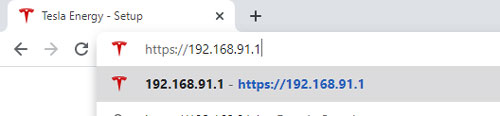
This will bring up a page warning you that you are joining an insecure page, because tesla wall generates it’s own SSL certificates.
Simply click advanced and this will start a login and installation wizard. Use your email you registered with Tesla as the username, and the password is the last 6 digits of the password you used to log into the TEG network. So for example your password on the sticker was JXOGKKLDOG would be KLDOG.
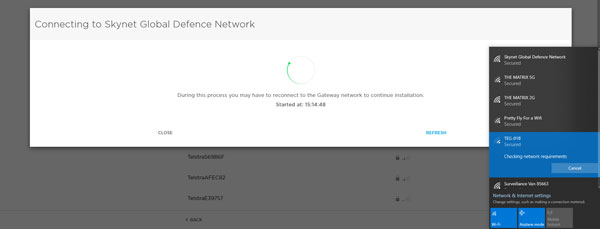
Next the wizard will ask you to choose a local network to connect your powerwall through. Choose your homes local WIFI, enter your homes WIFI password, and wait for the wizard to finish it’s job.
During this screen it says you may need to reconnect to TEG to complete the process. This is only if you have another networks setup to automatically connect. During the configuration process it will reset your router forcing you to connect to your automatic WIFI connections.
Once done you wont need to connect to TEG-xxxx anymore.